CP/Table Service
Tables are the most common way to view and navigate data in the ExpressionEngine control panel. Since tables share a lot of common functionality, we’ve abstracted most of it out to a Table service to handle tasks such as displaying the table markup, and sorting and filtering tabular content.
Below, we’ll cover the steps needed to create a table from inside a controller.
Creating a new table
The first thing we need to do is create our table object. This can be done by reaching into the dependency injection container and optionally passing along a few options that can affect the behavior and appearance of the table:
// Use default options
$table = ee('CP/Table');

// Specify other options
$table = ee('CP/Table', array('autosort' => TRUE, 'autosearch' => TRUE));
Here are the available options:
| Option name | Description | Accepted values | Default value |
|---|---|---|---|
| autosearch | Assuming the entire dataset is given to setData(), the Table service can automatically handle searching of the table’s data. The Table service will automatically get a search term from the search key in POST or GET, or a search term can be specified via the search configuration option outlined below. If you have a large data set, it’s recommended to disable autosearch and perform the search via SQL or other means before handing the data off to the table. | TRUE or FALSE to enable or disable, respectively. | FALSE |
| autosort | Assuming the entire dataset is given to setData(), the Table service can automatically handle sorting of the table’s data via column. The Table service will automatically look for a sort column and direction in GET, or they can be set manually via the sort_col and sort_dir configuration options outlined below. If you have a large data set, it’s recommended to disable autosort and perform the sort via SQL or other means before handing the data off to the table. | TRUE or FALSE to enable or disable, respectively. | FALSE |
| class | An optional CSS class to add to the table tag | String | NULL |
| lang_cols | Whether or not to run passed column names through the lang() helper on the front-end. | TRUE or FALSE to enable or disable, respectively. | TRUE |
| limit | Number of table rows to limit the data display by for the purposes of pagination. | A natural number greater than zero. | 20 |
| grid_input | Whether or not this table is to behave as Grid-like input interface. | TRUE or FALSE to enable or disable, respectively. | FALSE |
| page | When autosort and optionally autosearch are set to TRUE, specifies the page number to show in a set of paginated data. If page is found in the page’s query string, its value will be used. | A natural number greater than zero. | 1 |
| reorder | Whether or not to show a reorder handle on the left side of the table for reordering table rows. This can be used in conjunction with the eeTableReorder jQuery plugin documented below. | TRUE or FALSE to enable or disable, respectively. | FALSE |
| search | When autosearch is set to TRUE, specifies the search term used to search table contents. be used in conjunction with the eeTableReorder jQuery plugin documented below. | String or integer | NULL |
| sort_col | Specifies the column the table is currently being sorted by, identified by the column identifier, described below. If sort_col is found in the page’s query string, its value will be used. When autosort is enabled, the Table library will perform the sort. The sort_col value also determines which column is visually highlighted on the table interface. | String | NULL |
| sort_col_qs_var | Specifies the query string variable used to specify the column to sort the table by. This is typically only used if more than one table is displayed on a page. | String | sort_col |
| sort_dir | Specifies the direction of the table sort. sorted by, identified by the column identifier, described below. If sort_dir is found in the page’s query string, its value will be used. When autosort is enabled, the Table library will perform the sort. The sort_dir value also sets the visual indicator for sort direction on the table interface. | asc or desc | asc |
| sort_dir_qs_var | Specifies the query string variable used to specify the direction of the table sort. This is typically only used if more than one table is displayed on a page. | String | sort_dir |
| sortable | Whether or not the table should allow sorting via user interaction. When set to FALSE, column headings will not be click-able, highlighted, or show the visual sort direction indicators. | TRUE or FALSE to enable or disable, respectively. | TRUE |
Setting the columns
Now that our Table object is set up, let’s start describing our data. First, we’ll set up the headings for each column. Let’s say we want to show a list of Channels, we’ll then pass in an array of language keys that represent the relevant columns:
$table->setColumns(
  array(
    'id',
    'channel',
    'short_name',
    'manage' => array(
      'type'  => Table::COL_TOOLBAR
    ),
    array(
      'type'  => Table::COL_CHECKBOX
    )
  )
);
Note: Be sure to include the Table class’s namespace at the top of your file to use its constants: use ExpressionEngine\Library\CP\Table;
Notice we specified some extra parameters for two of the columns. The “Manage” column is going to be of type COL_TOOLBAR which can have various action buttons related to the individual Channel. And our last column is just for checkboxes, so that a user can select Channels to perform actions on them in bulk.
While we’re here, let’s set the “no results” text. This is the message that appears in the table when there are no items to display, and also provides a call-to-action to add items to the table:
$table->setNoResultsText('no_channels', 'create_channel', ee('CP/URL', 'channels/create'));
The first parameter is the language key that lets the user know there are no Channels to display. The second parameter is the text for the call-to-action button, and the third parameter is the URL for the button.
We should be at a point where we can see how our table is coming along. To show the table in a view, we’ll ask the Table object to compile data to be consumed by a view, and then pass that data to our view:
// Pass in a base URL to create sorting links
$vars['table'] = $table->viewData(ee('CP/URL', 'channels'));

return ee('View')->make('channels/index')->render($vars);
In our view, we’ll take the data and render the table markup by loading a shared view:
<?php $this->embed('ee:_shared/table', $table); ?>
Given what we’ve done so far, our table looks like this:
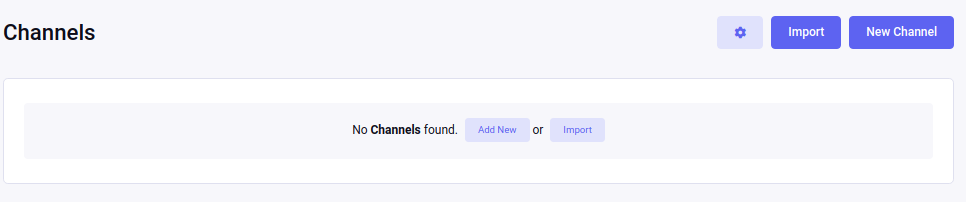
Table columns can have the following options set on them:
| Option name | Description | Accepted values | Default value |
|---|---|---|---|
| label | If you’d rather not specify the label has the options array’s key as done above, you can specify it here. This would also allow columns to have the same label, if needed. | String | NULL |
| encode | Whether or not to encode and escape the content of the cell to prevent markup or other code from executing on display. It’s typically best practice when dynamic, user-generated content is displayed, to escape its output. But if a table cell needs to contain and render HTML, encode should be set to FALSE for those columns. | TRUE or FALSE to enable or disable, respectively. | TRUE |
| sort | Whether or not to allow the column data to be sorted. By default, all text-based columns can be sorted, but other columns, such as toolbars and checkboxes, are not sortable. | TRUE or FALSE to enable or disable, respectively. | TRUE for COL_TEXT and COL_STATUS columns. FALSE for COL_CHECKBOX and COL_TOOLBAR columns. |
| type | Specifies the type of column, which ultimately determines how data will be interpreted and displayed in the view. | Table::COL_TEXT Table::COL_TOOLBAR Table::COL_CHECKBOX Table::COL_STATUS | Table::COL_TEXT |
Setting the data
For the purposes of this guide, we’ll get all the Channels for the current site:
$channels = ee('Model')->get('Channel')
  ->filter('site_id', ee()->config->item('site_id'))
  ->all();
Next, we’ll construct an array with the Channel data we want to display:
$data = array();
foreach ($channels as $channel)
{
  $edit_url = ee('CP/URL', 'channels/edit/'.$channel->getId());
  $data[] = array(
    $channel->getId(),
    array(
      'content' => $channel->channel_title,
      'href' => $edit_url
    ),
    $channel->channel_name,
    array('toolbar_items' => array(
      'edit' => array(
        'href' => $edit_url,
        'title' => lang('edit')
      ),
      'settings' => array(
        'href' => ee('CP/URL', 'channels/settings/'.$channel->getId()),
        'title' => lang('settings')
      )
    )),
    array(
      'name' => 'channels[]',
      'value' => $channel->getId(),
      'data'  => array(
        'confirm' => lang('channel') . ': <b>' . htmlentities($channel->channel_title, ENT_QUOTES) . '</b>'
      )
    )
  );
}
Notice the data is in the same order we set the columns. For the toolbar column, we pass a specifically-formatted array that tells the Table service what kind of button to show, as well as the link but the button and its title text. For the checkbox column, we need to specify the input name for the checkboxes, its value, as well as any optional data like the data we set here to work with an action modal.
Passing an array with the keys content and href will wrap the contents in an <a> tag, but only if the column has encode set to TRUE.
Note: Only use an edit URL when sending an href key along with the contents of a column.
Finally, we’ll tell our Table object about our data:
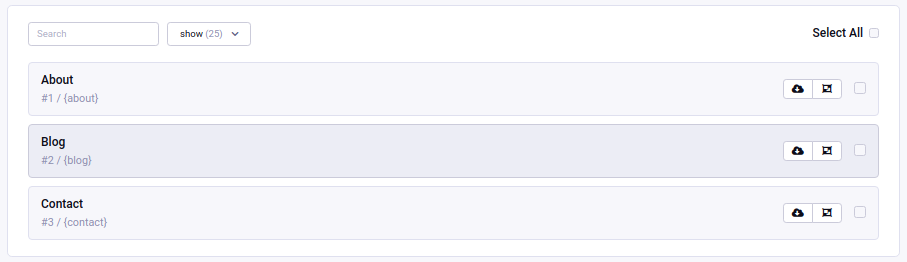
$table->setData($data);
Our table should now be filled with the available data and look the way we’ve configured:
Reorder-able rows
Tables built with the Table service support reordering of its rows and provides a JavaScript callback to perform any actions necessary post-reorder, such as any AJAX calls.
To create a table with reorder-able rows, we’ll create a new Table object with some specific options set:
$table = ee('CP/Table', array(
  'reorder' => TRUE,
  'sortable' => FALSE
));
From there, we’ll set our columns and data as usual. But to get it all working, we’ll need to include some JavaScript assets to facilitate the reorder:
ee()->cp->add_js_script('file', 'cp/sort_helper');
ee()->cp->add_js_script('plugin', 'ee_table_reorder');
Notice we loaded ExpressionEngine’s table reordering plugin. We’ll need to write some custom JavaScript to bind the plugin to our table, as well as perform any callback actions we may need:
$('table').eeTableReorder({
  afterSort: function(row) {
    // Whatever you like
  }
});
Notice there is a row object passed to the callback so that you can access the row that was moved, or any of its parents, siblings or children.
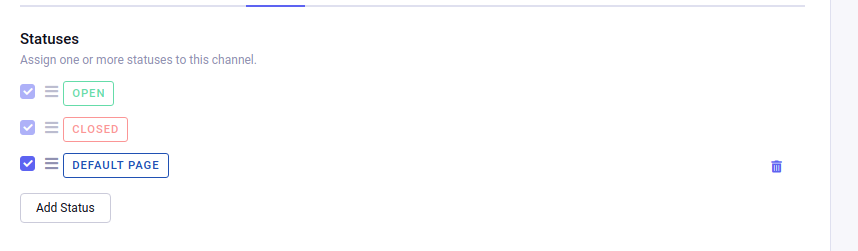
If we load our view, we should now see our table has reorder handles on the left side and we can drag them up and down the page to reorder the rows:
Using as a Grid input
The Table service is extend-able, and we’ve extended it to create a special GridInput service that can be used to create the very same user interface as our Grid field. Working with it is very similar to building a regular table.
First, we’ll create a new GridInput object and specify the base input name that all inputs will be namespaced under. This is the name you’ll access the Grid’s data from POST with:
$grid = ee('CP/GridInput', array(
  'field_name' => 'image_manipulations'
));
Next, we’ll set our columns as usual, but GridInput offers one more option to columns, and it’s the option to set instructions or a description for the column. So we’ll specify the column titles and their corresponding descriptions with language keys:
$grid->setColumns(
  array(
    'image_manip_name' => array(
      'desc'  => 'image_manip_name_desc'
    ),
    'image_manip_type' => array(
      'desc'  => 'image_manip_type_desc'
    ),
    'image_manip_width' => array(
      'desc'  => 'image_manip_width_desc'
    ),
    'image_manip_height' => array(
      'desc'  => 'image_manip_height_desc'
    )
  )
);
While we’re here, we’ll go ahead and set our “no results” message and button label. The function only takes two parameters here as a URL is not needed:
$grid->setNoResultsText('no_manipulations', 'add_manipulation');
Now, assuming we’ve already gathered the data we need in our $sizes variable, we’ll set our data:
$data = array();
foreach ($sizes as $size)
{
  $data[] = array(
    'attrs' => array('row_id' => $size['id']),
    'columns' => array(
      form_input('short_name', $size['short_name']),
      form_dropdown(
        'resize_type',
        array(
          'constrain' => lang('image_manip_type_opt_constrain'),
          'crop' => lang('image_manip_type_opt_crop'),
        ),
        $size['resize_type']
      ),
      form_input('width', $size['width']),
      form_input('height', $size['height'])
    )
  );
}

$grid->setData($data);
Notice the row is a bit more multidimensional this time. The data row now has an attrs key to set attributes on the table row element, and the actual row data has moved to the columns key. This can be done on any Table object for specifying row attributes. But we’re setting a content ID attribute here so that GridInput can properly namespace the inputs. And since this table is for inputting data, we enter inputs directly in to the data array this time, and populate them with our existing data, if available.
Which may beg the question, where do new rows come from? We’ve only entered existing rows so far, but GridInput needs a template to base new rows off of. We’ll call setBlankRow() to tell GridInput what a blank row should look like:
$grid->setBlankRow(array(
  form_input('short_name'),
  form_dropdown(
    'resize_type',
    array(
      'constrain' => lang('image_manip_type_opt_constrain'),
      'crop' => lang('image_manip_type_opt_crop'),
    )
  ),
  form_input('width'),
  form_input('height')
));
Before we hand the Grid off to the view, we need to load all of its JavaScript assets and initialization:
$grid->loadAssets();
Finally, just as we do with regular tables, we call viewData() and pass the data to our view where we render it with the ee:_shared/table view in our add-on view:
$vars['grid'] = $grid->viewData();

return ee()->cp->render('myaddon/myview', $vars);
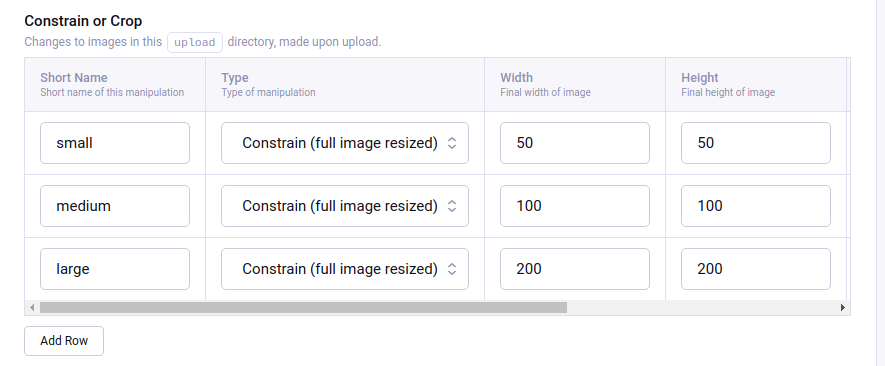
Here is the final, fully functional output of our code:
If you’re using the Shared Form View, your fieldset definition should look something like this:
array(
  'title' => 'constrain_or_crop',
  'desc' => 'constrain_or_crop_desc',
  'wide' => TRUE,
  'grid' => TRUE,
  'fields' => array(
    'image_manipulations' => array(
      'type' => 'html',
      'content' => ee('View')->make('ee:_shared/table')->render($sm_grid->viewData())
    )
  )
)
Note we’re setting wide to denote the field should take up the entire width of the form, and grid so the form display logic can do the necessary markup tweaks for proper styling and behavior of the Grid.
For those not using the Shared Form View, make sure your Grid is in a div tag instead of a fieldset tag and make sure it has a class of grid-publish.
Note: We must need to add “fieldset-faux” class as parent to the grid structure.