Add Control Panel Pages To Your Add-On
If you are working with an existing add-on, we recommend you start with Modernizing add-ons
Overview
If you have ever used some of the add-ons that ship with ExpressionEngine such as Block and Allow or Pro Search, you will notice those add-ons have settings and configuration pages associated with them in the Control Panel. You add this functionality to your add-on using Control Panel Routes.. Whenever you add a Control Panel Route to your add-on using the CLI, a ControlPanel/Routes and views folder is automatically created for you, opening the door to creating your own Control Panel settings and pages.
NOTE: Control Pages are what is rendered in the browser when visiting your add-on in the Add-on Manager. Control Panel Routes are what we had to our add-on that tells ExpressionEngine to render the pages. Think of it as we add a route to create a page.
Before adding a Control Panel route to your add-on, you need to already have an add-on in place. See Building An Add-On: Getting Started for how to generate the starter files for your add-on.
Creating An Amazing Control Panel Route
If your add-on doesn’t already have the required ControlPanel/Routes and views files, you can add a route to your add-on using the make:cp-route command in the CLI.
$ php system/ee/eecli.php make:cp-route
Let's create a control panel route!
What is the route name? index
What add-on is the route being added to? [amazing_add_on]:  amazing_add_on
Building control panel route.
Control panel route created successfully!
Follow the prompts to add the route to your add-on.
This will create an mcp.[addon_name].php file in your add-on along with a ControlPanel/Routes and views folder.
Inside of the ControlPanel/Routes folder, you will see that the CLI has created your first control route with ControlPanel/Routes/Index.php and a corresponding view in you views folder. This page is accessible via The Add-On Manager -> [Add-On Name] or via the /admin.php?/cp/addons/settings/[add-on-name] URL.
Create and Index route first. When your add-on has one or more Control Panel pages associated with it, your add-on’s card on the Add-On Manager page will link to the Index route of your add-on (ControlPanel/Routes/Index.php). If this route does not exist, users will be presented with a 404 page.
Anatomy Of A Control Panel Route
When you first add a route to your add-on a ControlPanel/Routes folder along with an ControlPanel/Routes/[RouteName].php starter file is created. The starter file will look something like this:
<?php

namespace ExpressionengineDeveloper\ControlPanel\Routes;

use ExpressionEngine\Service\Addon\Controllers\Mcp\AbstractRoute;

class Index extends AbstractRoute
{

    /**
     * @var string
     */
    protected $cp_page_title = 'home';

    /**
     * @param false $id
     * @return AbstractRoute
     */
    public function process($id = false)
    {
        $this->addBreadcrumb('index', 'Home');

        $variables = [
            'name' => 'Matt',
            'color' => 'Green'
        ];

        $this->setBody('Index', $variables);

        return $this;
    }
}
Let’s dissect the starter file:
$cp_page_title = 'home';
$cp_page_title defines what is rendered in the <title> tag in the browser.
function process($id = false)
The process() function, similar to other functionality in your add-on, is the meat of your route file. This is where you will render views, add sidebars, and add any necessary logic.
Adding Content To Your Page
Now that you have a page in the Control Panel that users can access, let’s look at how to output what you want users to see. There are four main areas to a Control Panel page where you will be outputting information to:
- Breadcrumb
- Sidebar
- Toolbar
- Main Body
Breadcrumbs
Located at the top of the Control Panel screen, breadcrumbs help users easily know where they are in the Control Panel and navigate your add-on’s settings quickly.

To add a breadcrumb for your current Control Panel page, simply use $this->addBreadcrumb().
In the starter route file created for you by the CLI you will already see $this->addBreadcrumb('index', 'Home');. This will add a breadcrumb similar to the one in the screen shot above (Add-Ons -> [Add-On Name] -> Home).
If you needed to add more levels to your breadcrumbs you can chain them together as such:
        $this->addBreadcrumb('amazing_add_on', 'Settings')
            ->addBreadcrumb('amazing_add_on/configuration', 'Configuration');
This would add a breadcrumb that would look like Add-Ons -> [Add-On Name] -> Settings -> Configuration
Sidebar
If your add-on has multiple Control Panel pages, a sidebar can be incredibly helpful for your users to easily navigate between pages. Sidebars can either be generated automatically or manually.
Both of these options start with generating your sidebar class using the CLI.
We use the make:sidebar CLI command to generate a sidebar file for us.
$ php system/ee/eecli.php make:sidebar
What add-on is the sidebar being added to? [amazing_add_on]:  amazing_add_on
Building sidebar.
Sidebar created successfully!
This will create the file ControlPanel/Sidebar.php in your add-on’s folder.
amazing_add_on
┣ ControlPanel
┃ ┣ Sidebar.php
┗ ...
Note: An add-on can only have one sidebar file.
Inside of our Sidebpar.php file we’ll have the following:
<?php

namespace ExpressionEngineDeveloper\ControlPanel\Routes;

use ExpressionEngine\Service\Addon\Controllers\Mcp\AbstractSidebar;

class Sidebar extends AbstractSidebar
{
    public $automatic = true;

    /**
     * @param false $id
     * @return AbstractRoute
     */
    public function process()
    {
    }
}
Automatically Generate Your Sidebar
If you’d like to have your sidebar automatically generated then that’s it! The Sidebar class will scan our ControlPanel/Routes folder for all available Control Panel routes and automatically create respective entries in our sidebar. There’s no need to add the sidebar to your Control Panel page as it will automatically be added when the page is rendered.
Example:
With an add-on folder like this:
amazing_add_on
┣ ControlPanel
┃ ┣ Routes
┃ ┃ ┣ Configurations.php
┃ ┃ ┣ Settings.php
┃ ┃ ┣ Licenses.php
┃ ┃ ┣ Index.php
┃ ┗ Sidebar.php
┗ ...
Would produce a sidebar in the Control Panel like this:
You can take this a step further by adjusting the following properties in your Control Panel routes (ControlPanel/Routes/[route_name].php) to adjust how sidebar items are displayed:
protected $sidebar_title (string)
By default the sidebar link text is based on your route’s name. This property will overwrite the text displayed for this route.
protected $sidebar_icon (string)
The Font Awesome icon you wish to display next to the sidebar link for this route.
protected $sidebar_priority (int)
Give this route a higher priority in the sidebar. Higher priority items will appear first in the sidebar.
protected $exclude_from_sidebar (bool)
Exclude this route from the sidebar.
protected $sidebar_divider_before (bool)
Inserts a divider in the sidebar before the link to this route.
protected $sidebar_divider_after (bool)
Inserts a divider in the sidebar after the link to this route.
You can even modify the generated sidebar in the process() method of your ControlPanel/Routes/Sidebar.php file by utilizing the CP/Sidebar Service.
Manually Generate Your Sidebar
We will set the $automatic property in our ControlPanel/Routes/Sidebar.php file to false.
public $automatic = false;
This tells our Sidebar class not to automatically create any sidebars.
From here you can utilize the CP/Sidebar Service in the process() method of our Sidebar class to manually create your sidebar and all related items.
Toolbar
The toolbar is a series of icons located in the top right of your add-on settings page. Many add-ons use this area for quick links to settings or other areas of their add-on settings.

We can add items to the Toolbar by passing an array into ee()->view->header.
$header['toolbar_items'] = array(
    'settings' => array(
        'href'  => ee('CP/URL','addons/settings/amazing_add_on'),
        'title' => 'settings'
    ),
    'user ' => array(
        'href'  => ee('CP/URL','addons/settings/amazing_add_on/user_settings'),
        'title' => 'Users'
    ),
    'export ' => array(
        'href'  => ee('CP/URL','addons/settings/amazing_add_on/export'),
        'title' => 'Export Data'
    )
);

ee()->view->header = $header;
The icon used in the toolbar for each link corresponds to each items title element in the array. Available icons are add,author,cart,category,caution,changes,channel,close,columns,dashboard,date,delete,export,files,filters,folder,gift,home,invisible,issue,locked,logout,members,missing,nested,offline,primary,remove,reorder,settings,status,success,sync,tabbed,tip,tools,user,view,visible,export,settings.
Main Body
Probably the most important part of your add-on’s Control Panel page is the main body.
There are two ways to output to the main body of your add-on’s page.
- HTML String
- Using Views
The setBody() method is smart enough to know what you’re trying to do. If you pass a single parameter to the method such as $this->setBody($myString), the method knows you are only passing a single string to be rendered on your page. However, if you pass multiple parameters such as $this->setBody('Index', $variables);, the method knows that you are passing a View and an array of variables that should be passed to the View.
Continue reading to see examples of how to use these two options.
HTML String
If you would just like to output a string of HTML for you control panel page, then you would just do something like the following:
 public function process($id = false)
    {
      $this->addBreadcrumb('index', 'Home');

      $html = "<h2>Welcome to my add-on</h2><p>This is an amazing add-on that does amazing things!"

      $this->setBody($html);

      return $this;
    }
This would produce a page looking like this:
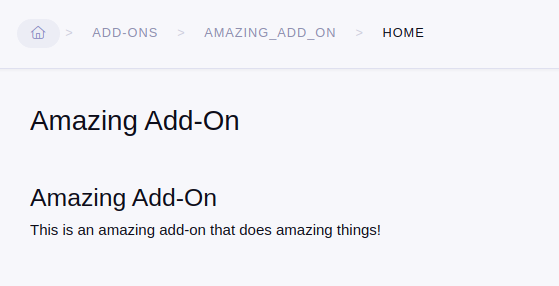
If you would like to make this page more dynamic or include additional functionality, then you need to explore using Views.
Views
When your add-on was created via the CLI a views folder was also created in your add-on’s folder. Inside of this folder a file was also created, views/Index.php. By default this Control Panel page is already using the View service by calling $this->setBody().
$variables = [
    'name' => 'Matt',
    'color' => 'Green'
];

$this->setBody('Index', $variables);
As we can see here, the route file is passing two arguments to $this->setBody():
Indexis the name of the corresponding view to use (referencesviews/Index.php)$variablesis an array of variables that will be available to the view.
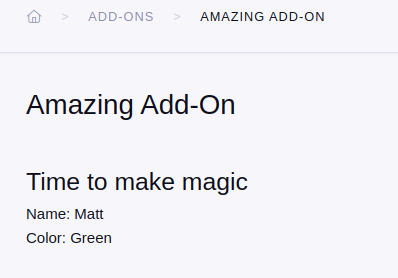
Now let’s look at the view itself, found at views/Index.php.
<?php

echo "<h2>Time to make magic</h2>";

if (isset($name)) {
    echo "<p>Name: " . $name . "</p>";
}

if (isset($color)) {
    echo "<p>Color: " . $color . "</p>";
}
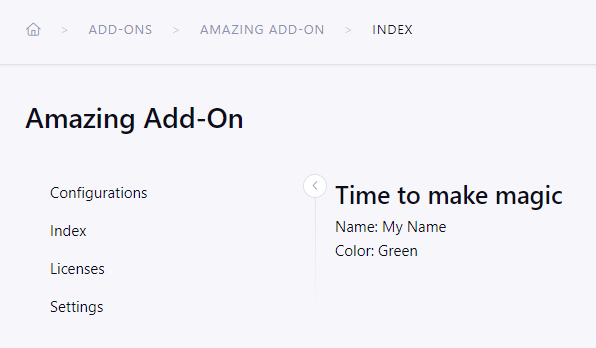
Notice the variables $name and $color correspond to the $variables array passed to the view in the route file.
This renders as such:
Taking this a bit further, we can use the CP\Form service to display panels and forms similar to what is found on many pages in the Control Panel.
Using the CP\Form is highly recommend to speed up your development and to maintain the integrity of the Control Panel design.
We’ll start by using the CP\Form service in a method which will return our $form array. The $form array will then be passed to our View through our $variables array.
private function getForm()
{
  $form = ee('CP/Form');
  $form->asTab();
  $form->asFileUpload();
  $field_group = $form->getGroup('header 1');
  $field_set = $field_group->getFieldSet('first_name');
  $field_set->getField('first_name', 'text')
            ->setDisabled(true)
            ->setValue('Eric');

  return $form->toArray();
}
Now, let’s add that to our route file and be sure to pass the array returned from getForm() to our view.
public function process($id = false)
{

  // set the breadcrumb
  $this->addBreadcrumb('index', 'Home');

  // call our getForm() method to get
  // our array
  $form = $this->getForm();

  // store our form in our $variables array
  // to be passed into our view
  $variables = [
    'form'  => $form
  ];

  $this->setBody('Index', $variables);

  return $this;
}

private function getForm()
{
  $form = ee('CP/Form');
  $form->asTab();
  $form->asFileUpload();
  $field_group = $form->getGroup('header 1');
  $field_set = $field_group->getFieldSet('first_name');
  $field_set->getField('first_name', 'text')
            ->setDisabled(true)
            ->setValue('Eric');

  return $form->toArray();
}
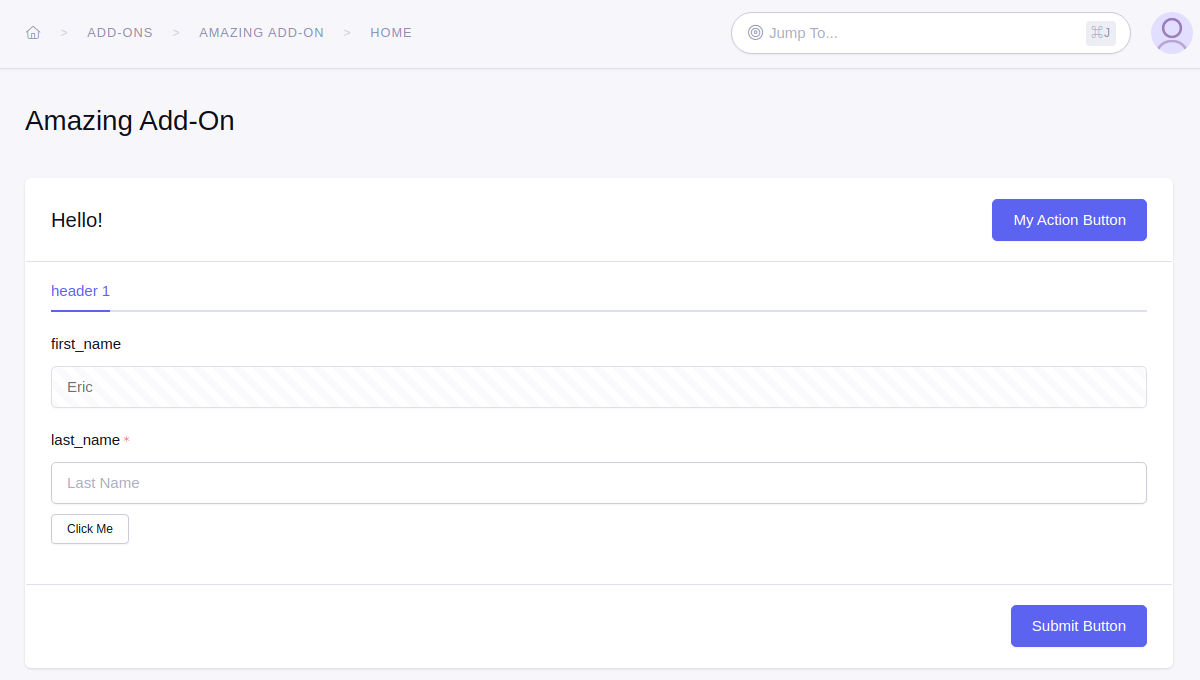
Since we passed our form to our view in the $variables array, inside of views/Index.php we can now use the View service to render our $form array as the main body of our Control Panel page.
if (isset($form)) {
    echo ee('View')->make('ee:_shared/form')->render($form);
}
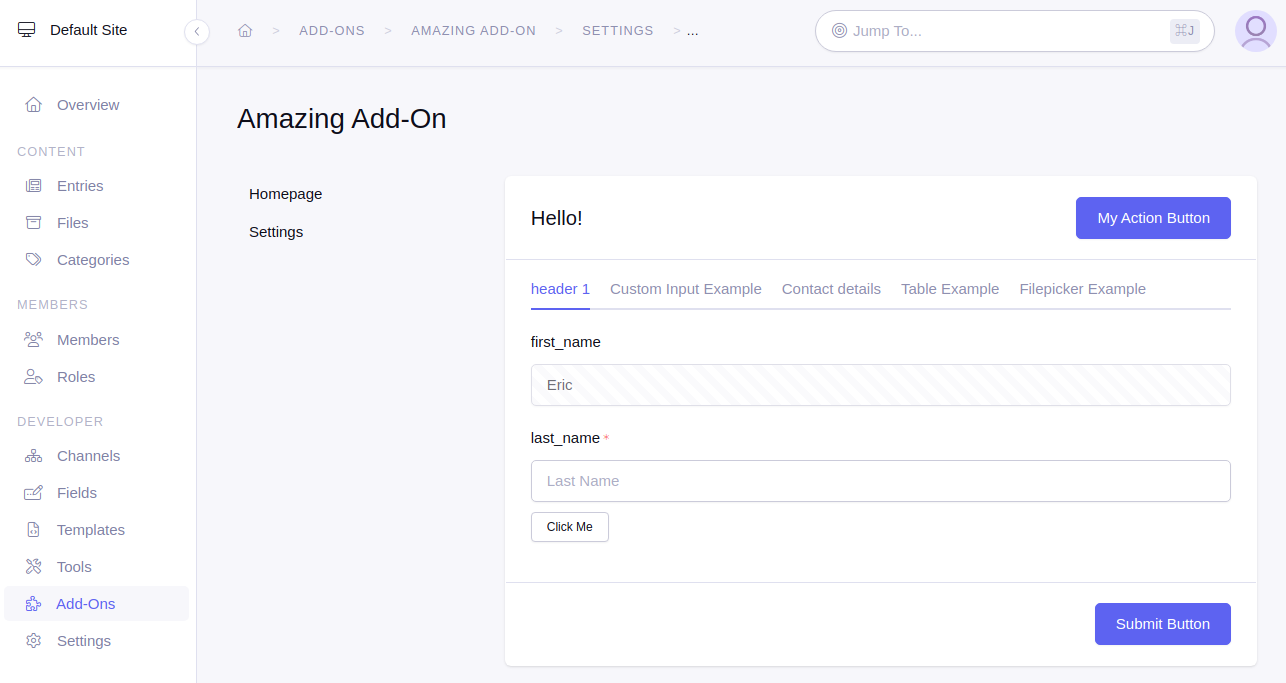
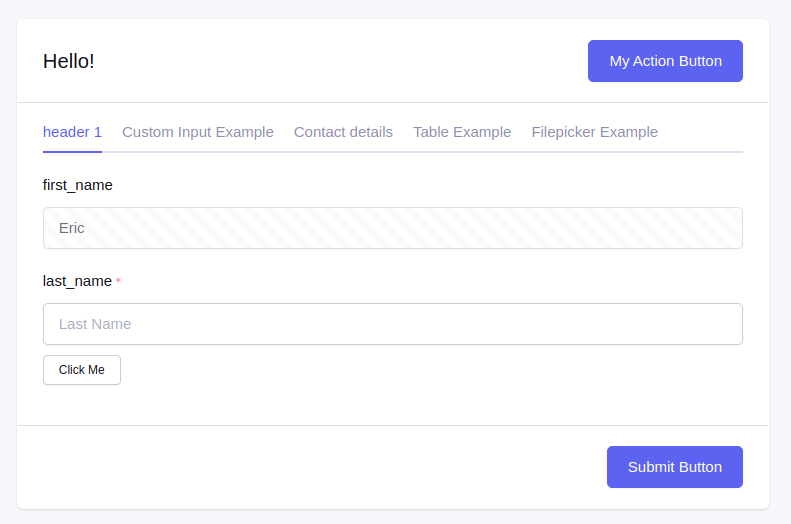
Your add-on will now have a Control Panel page with a form as seen in this screenshot:
Finally, make the form submission do something. The form is being submitted to same CP controller, so we can check whether it has been submitted by adding ee('Request')->isPost() check. For the sake of this demo, we’ll skip the database saving part and just display success message on submission.
public function process($id = false)
{
  if (ee('Request')->isPost()) {
    ee('CP/Alert')->makeBanner('amazing_add_on')
      ->asSuccess()
      ->withTitle(lang('success'))
      ->addToBody('Form has been submitted!')
      ->now();
  }

  // set the breadcrumb
  $this->addBreadcrumb('index', 'Home');

  // call our getForm() method to get
  // our array
  $form = $this->getForm();

  // store our form in our $variables array
  // to be passed into our view
  $variables = [
    'form'  => $form
  ];

  $this->setBody('Index', $variables);

  return $this;
}
This is only the beginning of what you can do with forms in the Control Panel. Read more in the docs on the CP\Form service to understand what else is possible.
{ee:u} Learn more about the CP\Form service on ExpressionEngine University.
Adding More Pages
Often your add-on will need more than one page in the Control Panel. The CLI makes this simple.
Start with:
php system/ee/eecli.php make:cp-route
This adds a new file to your ControlPanel/Routes folder which will act similar to the Index page we discussed above, along with a matching View in our views folder.
Now inside of your ControlPanel/Routes folder you have a new file and matching class based on the name you chose in the CLI. This page will be accessible based on the class name you provided. For example:
php system/ee/eecli.php make:cp-route
What is the route name? configurations
Which add-on would you like to add this to? amazing_add_on
Control panel route created successfully!
This will create a file in my ControlPanel/Routes folder called Configurations.php which will look like this:
<?php

namespace ExpressionengineDeveloper\ControlPanel\Routes;

use ExpressionEngine\Service\Addon\Controllers\Mcp\AbstractRoute;

class Configurations extends AbstractRoute
{

    /**
     * @var string
     */
    protected $cp_page_title = 'configurations';

    /**
     * @param false $id
     * @return AbstractRoute
     */
    public function process($id = false)
    {

        $variables = [
            'name' => 'Matt',
            'color' => 'Green'
        ];

        $this->setBody('Index', $variables);

        return $this;
    }
}
This page will now be accessible via /admin.php?/cp/addons/settings/amazing_add_on/configurations.
At this point you probably want to make sure you update your breadcrumb on your second page and create a sidebar item to ensure users can easily access this page.
If you just want to create a new View without a Control Panel Route, simply duplicate a current view and rename the file and class accordingly.
JavaScript
ExpressionEngine includes both its own JavaScript library as well as the The jQuery JavaScript library, enabling developers to easily include JavaScript enhancements. It is worth noting some ‘best practices’ when using JavaScript in your control panel:
Loading jQuery plugins:
ee()->cp->add_js_script(array('plugin' => 'dataTables'));Outputting JavaScript to the browser:
ee()->javascript->output();After defining any JavaScript output, you must compile in order to display it:
ee()->javascript->compile();