Developing Prolets
Overview
Prolets are add-on components that live in the Dock and bring parts of an add-on’s functionality to content editors on the front end.
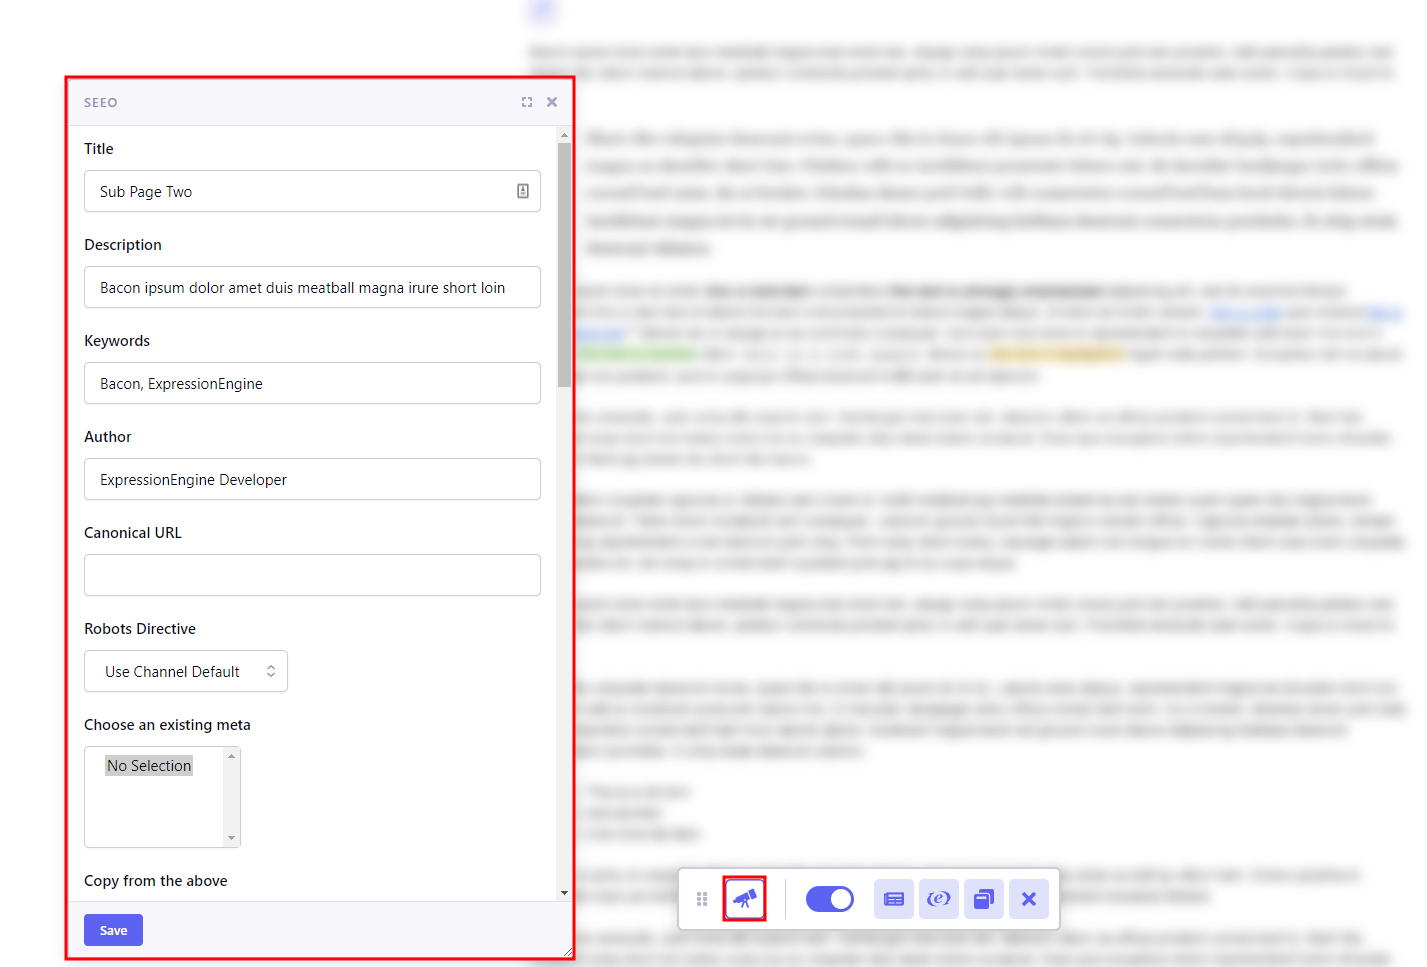
Here is an example of the add-on SEEO’s prolet, which easily allows editors to edit SEO data for the entry they are currently viewing:
Before adding a Prolet to your add-on, you need to already have an add-on in place. See Building An Add-On: Getting Started for how to generate the starter files for your add-on.
Creating An Amazing Prolet
Creating a Prolet is straightforward using the make:prolet command in the CLI.
$ php system/ee/eecli.php make:prolet
Follow the prompts to add a prolet to your add-on.
This will create a file in your add-on’s folder named pro.[addon_name].php
amazing_add_on
...
┣ pro.amazing_add_on.php
┗...
Anatomy Of A Prolet
Inside a prolet file, you are required to define the prolet class. The class name should consist of prolet name with the first letter capitalized followed by _pro postfix. So for the example above, the class name will be Sample_prolet_pro.
All prolets are required to implement ExpressionEngine\Addons\Pro\Service\Prolet\ProletInterface.
The easiest way to achieve that is to make prolet extend abstract class ExpressionEngine\Addons\Pro\Service\Prolet\AbstractProlet.
When using the CLI, this file will be properly constructed for you.
When generated with the CLI, your prolet will initially look like this:
<?php

use ExpressionEngine\Addons\Pro\Service\Prolet\AbstractProlet;
use ExpressionEngine\Addons\Pro\Service\Prolet\ProletInterface;

class Amazing_add_on_pro extends AbstractProlet implements ProletInterface
{
    protected $name = 'Amazing Prolet';

    public function index()
    {
        return 'This is a new prolet generated from the CLI.';
    }
}
Icon
On each page load, prolets appear on the front-end as Dock buttons. If not specified otherwise, icon.svg from the add-on package folder is used as the Dock button. If you want to specify a different icon to use from the add-on’s folder, you can do that using protected $icon property or public function getIcon().
protected $icon = 'sample_prolet.png';
or
public function getIcon()
{
    return 'sample_prolet.png';
}
Name
Each prolet is required to have a name, which is used as the title for the Dock button and also for the prolet’s popup window. It can be defined using protected $name property or public function getName(). Using the function is recommended because you are able to use the lang key in it, making the name translatable.
protected $name = 'Sample Prolet';
or
public function getName()
{
    return lang('sample_prolet');
}
Popup Window Size
If the prolet is opening a popup window (which is what currently all prolets are doing), you are able to specify the window size. Available options are footer, large and small (default). You do this using the protected $size property or public function getSize().
protected $size = 'footer';
or
public function getSize()
{
    return 'large';
}
Popup Window Buttons
By default, each prolet popup window is generated with a “Save” button in the footer that sends the “save” JavaScript event to the prolet. You can change that to display different buttons, or no buttons at all, using the protected $buttons property or public function getButtons().
protected $buttons = []; // No buttons will be shown
or
public function getButtons()
{
    return [
        ['text' => lang('do_something_cool'), 'event' => 'let_everyone_know'],
        ['text' => lang('do_something_else'), 'event' => 'keep_secret']
    ];
}
Controller Action
Prolets are required to contain a method which will generate the data to be outputted. By default, this is assumed to be the index() method. However you can specify a different function name using protected $action property or public function getAction().
protected $action = 'do_something_cool';
or
public function getAction()
{
    return 'do_something_else';
}
The prolet’s action method (public function index(); or function with name returned by getAction() as explained above) can return an array of data or a string.
If the data returned is of Array type, it is being passed to ExpressionEngine Pro’s shared form view, which is similar to ExpressionEngine’s Shared Form View, however you are only required to have sections key in the returned data array. The result will be a form with submission endpoint being set to same prolet controller action.
public function index()
{
    if (ee('Request')->isPost()) {
        //handle form submission
        return ee()->output->send_ajax_response(['success']);
    }
    $vars['sections'] = array(
      array(
        array(
          'title' => 'site_name',
          'fields' => array(
            'site_name' => array(
            'type' => 'text',
            'value' => $site->site_label,
            'required' => TRUE
            )
          )
        )
      )
    );
    return $vars;
}
If the data returned is of String type then this string is being wrapped in some required HTML and returned into the prolet popup window. In you need a form to be created, you would need to handle that (additionally you can use one of your actions as endpoint).
Prolets are expecting form submissions to return JSON upon successful response, which will close their windows.
Prolet Types
Essentially there are two types of prolets.
Non-initializable prolets are displayed and allow data manipulation on every page of website where the Dock is enabled.
Initializable prolets work the same way, but they are only displayed on pages where they have been initialized, which usually would happen by placing certain template tags in the template.
Initializable Prolets
Initializable prolets are required to implement ExpressionEngine\Addons\Pro\Service\Prolet\InitializableProletInterface.
use ExpressionEngine\Addons\Pro\Service\Prolet;

class Sample_prolet_pro extends Prolet\AbstractProlet implements Prolet\InitializableProletInterface
{
    protected $name = 'Sample prolet';

    public function index()
    {
        return 'Hello world!';
    }
}
In order for the prolet to be initialized, the template tag from your add-on needs to be called on page. In the programmatic code for that tag, you would need to place a call to ee('pro:Prolet')->initialize()
if (defined('IS_PRO') && IS_PRO) {
    ee('pro:Prolet')->initialize('sample_prolet', ['entry_id' => $entry_id]);
}
You would need to make sure to wrap the code in if (defined('IS_PRO') && IS_PRO) { conditional, so it would be run only on ExpressionEngine versions that support Pro and have it installed.
Two parameters need to be passed to ee('pro:Prolet')->initialize() function.
First is the prolet name, in our example sample_prolet.
Second is an array of data that is being passed to prolet via GET request (in our example we pass entry_id).