Retired Documentation
You are using the documentation for version 2.11.9. Go here for the latest version or check here for your available upgrades to the latest version.
Building a Simple News Site from Start to Finish
This guide will introduce you to the basic concepts behind ExpressionEngine. We’ll create a simple two-page site with a news section to show a glimpse of the power, flexibility and level of control over your markup that ExpressionEngine offers over other systems.
Before You Begin
ExpressionEngine assumes that you are comfortable with basic HTML. If you aren’t, we recommend j-learning.org’s basic HTML tutorial.
If you have not installed ExpressionEngine yet, please do so now, making sure to choose “None - Empty Installation” for your Site Theme when prompted. The other available theme, Agile Records, is a complete website for a fictitious music label and is simply a more complex and fully fleshed-out version of what we’re going to build here. It’s okay if you’ve already installed ExpressionEngine with the Agile Records theme, but most of what we do here will have already been done for you. You can still easily follow along, though.
The Control Panel
Upon completing the installation you are given two links. One is your site’s homepage, which isn’t very exciting (in fact it should appear blank since we haven’t created any content yet!) and the other is your site’s Control Panel.
Follow the link to your Control Panel (also known as the “back end”) and log in using the same username and password you provided during installation. If you don’t remember your Control Panel link, it’s usually similar to: http://example.com/admin.php
Important
If your Control Panel link just brings up the Installation Wizard again, you need to remove the system/installer folder from your server as outlined in the Installation Instructions.
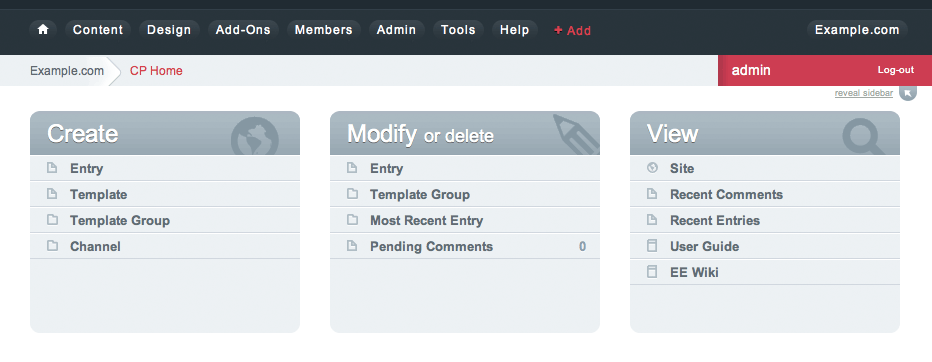
After logging in, you’ll be greeted by the Control Panel Home page:
Channels
ExpressionEngine stores all of your information inside Channels. A Channel is simply a container that can be as simple or as complex as you need it to be, depending on your content. You can have as many Channels as you need, each with a different structure tailored to the content it holds.
For our new site, we know we’ll want to keep visitors informed of what’s new. Let’s create a Channel to hold this content.
Creating a Channel
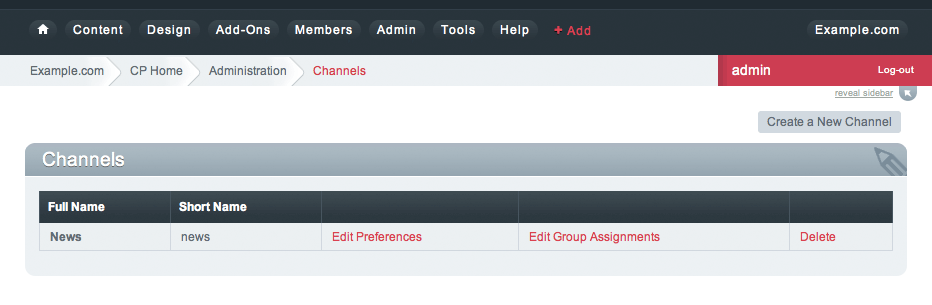
- Go to .
- Click the Create a New Channel button in the upper-right.
- For the Full Channel Name, call it “News”.
- ExpressionEngine will automatically provide a sensible Short Name for you, in this case, “news”.
- Click Submit.
You’ll see the new Channel we just created:
Tip
A Channel’s Full Name should be a friendly, human-readable name. The Short Name, on the other hand, is how you’ll refer to this Channel in your actual code. Don’t worry, we’ll get to that later.
Channel Fields
We have our News Channel, but we haven’t given it any structure to hold our content yet. Channel Fields let us do just that. There are many types of fields, and a Channel can hold any number of Channel Fields.
First, we need to create a Channel Field Group to hold our Channel Fields. Why is this? Simply put, Channel Field Groups make it easy to organize and re-use a particular set of Channel Fields. We’ll discuss groups further in a bit.
Creating a Channel Field Group
- Go to .
- Click the Create a New Channel Field Group button in the upper-right.
- Let’s be startlingly creative and name this group “News Fields”.
- Click Submit.
Our new Channel Field Group is shown, as well as the fact that it currently holds zero (0) fields:

For our simple news section, let’s create a basic Textarea field to hold the content, or “body”, of each news article.
Creating a Channel Field
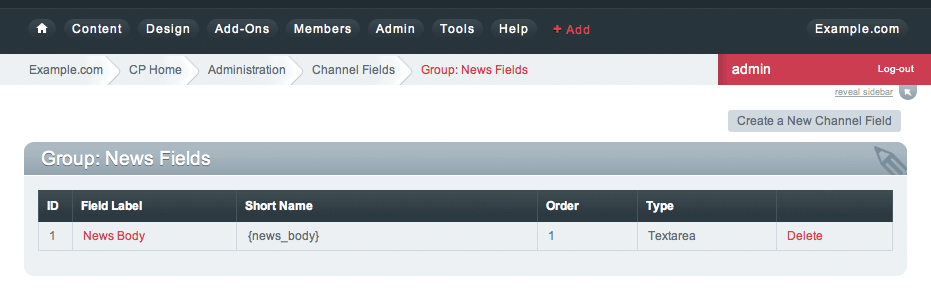
- Click the News Fields group.
- Click the Create a New Channel Field button in the upper-right.
- For Type, choose Textarea. (Notice the other available types - exciting, no? Add-ons can even provide completely new types of fields.)
- For Field Label, type “News Body”.
- ExpressionEngine will automatically provide a sensible Short Name for you, in this case, “news_body”.
- Let’s keep it simple and leave the rest of the settings at their defaults. Click the Submit button at the bottom of the page.
Behold, our beautiful new Channel Field:
Channel Group Assignments
Even though we’ve created our News Channel, as well as our News Fields Group, we haven’t explicitly linked the two together yet. Let’s do that now.
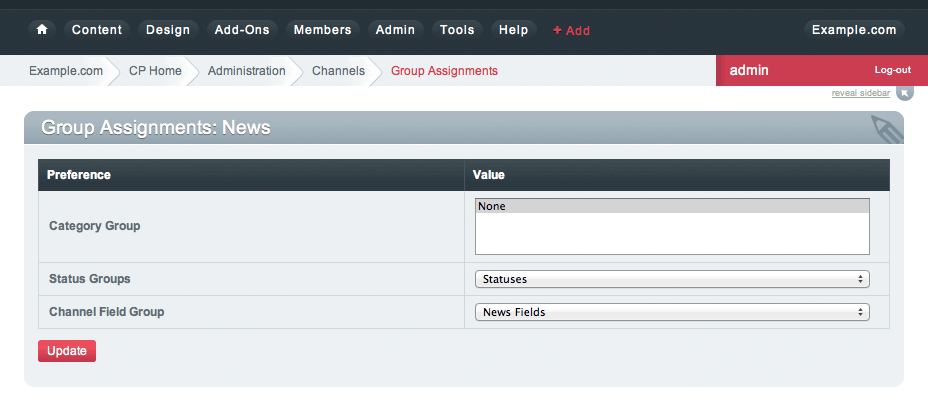
- Go to .
- Click the Edit Group Assignments link located to the right of the News Channel.
- Leave Category Group set to “None”.
- Set Status Group to “Statuses”.
- Set Channel Field Group to “News Fields”.
- Click Update.
As you’ve just seen, every Channel can have three types of Groups assigned to it. Let’s go over each one in a bit more detail.
Category Group
Categories are a nice way to better organize all of your content in each Channel. While we aren’t creating any Categories for the purposes of this guide, know that they are a very powerful feature with full hiearchy support and more. See the Categories section for more information.
Status Group
Statuses are typically used to control whether or not (or to whom) a piece of content will appear on your site. In this guide we’ve stuck with ExpressionEngine’s default Status Group, which contains two Statuses: Open and Closed. By default, content with an “Open” status will be shown, while content that is “Closed” will not appear at all. There are other creative uses for Statuses, especially when it comes to editorial workflows. See the Statuses section for more information.
Channel Field Group
Channel Fields are the core of ExpressionEngine’s content management abilities. They allow the system to fit to your content, instead of the other way around.
Why Groups?
As you’ve probably noticed, Categories, Statuses and Channel Fields are all contained within groups. This allows for easy re-use without duplicating effort. For example, if in the future we create a new Channel, but decide that it will use similar Categories, Statuses or Channel Fields, we can simply assign the already-existing group(s) to the new Channel.
Publishing Entries
Now that we’ve set up a basic, solid structure, let’s add some content!
In ExpressionEngine, each time you add content to a Channel you are publishing to that Channel and creating a new Entry in it. You can think of Entries as being synonymous with posts, but the term Entry better encompasses all of the different types of data you can store in ExpressionEngine.
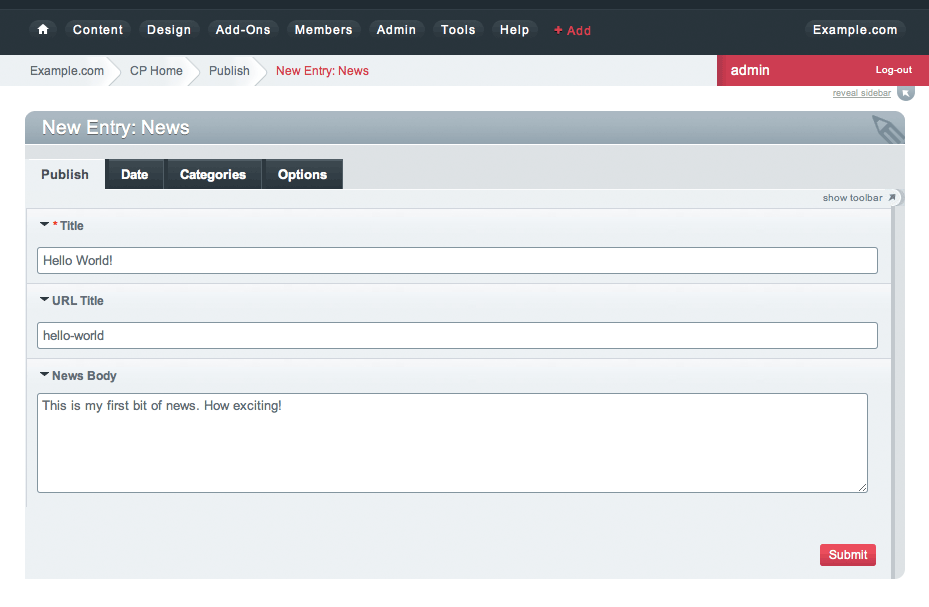
- Go to . Since we only have one Channel (News), ExpressionEngine automatically chooses it.
- For the Title, type “Hello, World!”. Notice that we did not have to create this field ourselves - all Entries automatically have a Title field.
- ExpressionEngine provides a sensible URL Title for you. This is another automatic field that allows your entries to be easily linked to via a URL. See URL Structure for more information.
- Enter some text in the News Body field. Make it good!
- Click Submit to publish the Entry.
Upon submitting, you’ll be taken to the View Entry page, which simply provides an overview of all the content you just entered:
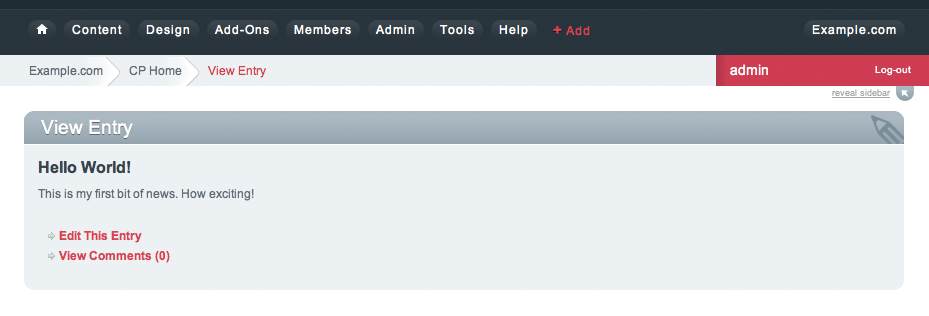
From here you could edit the Entry to make any necessary corrections, or navigate to another area of the Control Panel.
For the purposes of this guide, publish a second Entry by following the same steps as before, but with a different Title and News Body. That will give us two Entries to work with later.
Templates
You’ve probably noticed that even though we’ve entered some content in the Control Panel, our site’s actual homepage remains woefully blank! Fear not - we just haven’t told ExpressionEngine how to display our content. That’s where Templates come in.
Templates control what gets shown to the outside world (also known as the site’s “front end”) and are grouped together into (you guessed it!) Template Groups. As usual, you can have as many Templates and Groups as you need. Templates are very important because they also define the URL structure of your site. Here’s how Template Groups and Templates make up an ExpressionEngine URL:
http://example.com/template_group/template_name
Every Template Group has at least one Template named index, which acts as the default if no other Template is specified. For example, if we create a new Template Group named news, you can access its index template using just:
http://example.com/news
Creating a Template
Let’s create our first Template, which will be a simple news page that displays Entries from our News Channel.
- Go to .
- Click the New Group button.
- For Template Group Name, type “news”.
- Check the box next to Make the index template in this group your site’s home page?
- Click Submit.
As expected, this automatically creates an index Template in our new news Group:

Now let’s get some content in there!
Editing a Template
Click on the index Template to open it in the Template Editor. You’ll be greeted, unsurprisingly, with a blank slate. Let’s add some skeleton HTML:
<!DOCTYPE html>
<html>
<head>
        <title>What's New</title>
        <meta charset="utf-8">
</head>
<body>
        <h1>All the news that's fit to pixelize.</h1>
</body>
</html>

Click Update to save our changes and stay on the page (Update and Finished will return you to the Template Manager). Then click the View Rendered Template button in the upper-right, which should open the page in a new browser tab. It may not be very exciting, but it’s something:

Tip
You’re not confined to editing your markup inside ExpressionEngine’s Template Editor. You can enable Saving Templates as Text Files and then work with Template files using any editor you choose.
“This is all well and good,” you might be saying. “ExpressionEngine is outputting my markup exactly as entered; no more or less, which is awesome. But it’s still not showing any of the content I entered into the News Channel!”
Strap yourself in, because we’re about to do just that, and we’re going to do it using the core of ExpressionEngine’s flexibility: Tags.
Tags
Tags fetch the content you’ve entered into ExpressionEngine and display it in your Templates just the way you want. Here’s how a typical Tag starts:
{exp:channel:entries}
This tag, like most, has three segments: exp, channel, and entries.
- exp simply tells ExpressionEngine that this is a Tag. All Tags will begin with this.
- channel refers to the Module we want to use to fetch our data. ExpressionEngine is made up of various Modules, and each provides its own Tags. The Channel is used to fetch data from your Channels, and is the most commonly used Module in ExpressionEngine.
- entries refers to the type of data we want the Module to fetch, or in some cases, the action we want the Module to take. In this case, we’re telling the Channel Module that we want to retrieve our Entries.
Parameters
We often need to give more information to a Module about what we want it to do. In our example above, for instance, we still need to tell the Channel Module which Channel we want to fetch Entries from. This is easily done with parameters:
{exp:channel:entries channel="news"}
You can specify multiple parameters, too:
{exp:channel:entries channel="news" limit="10"}
This tells the Channel Module that we want the 10 most recent Entries from the Channel named News. Simple enough, right? Now that we’ve told it what to fetch, let’s actually use that data!
Tip
Here’s the full list of available parameters for the Channel Entries Tag.
Variables
Variables are the actual pieces of information that ExpressionEngine retrieves and makes available to us. To get some content from an Entry, for example, use the Short Name of the Channel Field. Remember the News Body field we created earlier? You can get its contents like so:
{news_body}
And the Title of the Entry is easily accessed with:
{title}
There is also a lot of additional information about each Entry, such as when it was submitted, who it was submitted by, and much more. For example, to get the author of an Entry:
{author}
Now, we’re ready to use this Tag in our Template.
Tip
Here’s the full list of available variables for the Channel Entries Tag.
Putting it All Together
Switch back to the Template Editor tab in your browser and update the Template with the following code:
<!DOCTYPE html>
<html>
<head>
<title>What's New</title>
<meta charset="utf-8">
</head>
<body>
<h1>All the news that's fit to pixelize.</h1>
{exp:channel:entries channel="news" limit="10"}
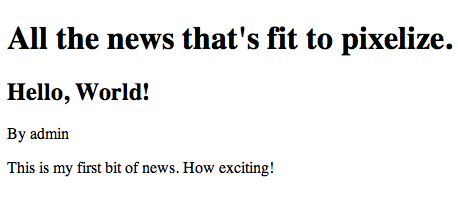
<h2>{title}</h2>
<p>By {author}</p>
{news_body}
{/exp:channel:entries}
</body>
</html>
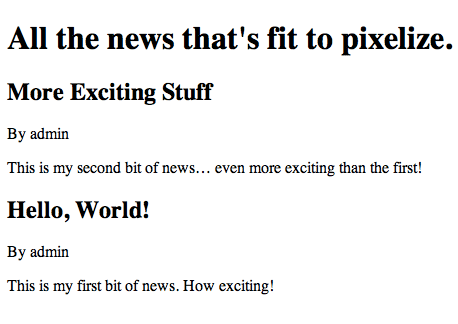
After clicking Update, switch back over to the browser tab with the “Rendered Template” on it and hit Refresh. By default, the Channel Module sorts your Entries by newest to oldest, so you should now see your two previously-created Entries in all their glory:
The More You Know
You’ve seen how to show the content you want, and how wrap it in any HTML you’d like, and you’re well on your way to unleashing awesome across the (digital) land. But first, let’s go over a few points about what we just did.
Tag Pairs vs. Single Tags
Did you notice the {/exp:channel:entries} line in the code above? It’s called a closing tag, and it is required in order to close the opening {exp:channel:entries} Tag, in much the same way that closing certain HTML elements is required.
Most Tags in ExpressionEngine have both an opening and a closing Tag. We refer to them as Tag Pairs to differentiate them from Single Tags. Single Tags are just an opening Tag - no closing Tag or variables inside. These are more rare and are typically used by some Modules to display a single piece of information.
Looping Tag Pairs
The {exp:channel:entries} Tag that we’ve used here is a good example of a Looping Tag Pair. It took the code we placed between its opening and closing Tags and actually processed it twice - once for each Entry.
This is a very powerful way to output information from multiple Entries, whether in a table, blog format, or even a simple list. For example:
<ul>
        {exp:channel:entries channel="news" limit="10"}
                <li>{title}</li>
        {/exp:channel:entries}
</ul>
Turning the Page
At this point, you might notice that our site’s homepage (http://example.com) is showing the same content as our News page (http://example.com/news). The reason for this is simple: remember checking the box next to Make the index template in this group your site’s home page? when you created the “news” template group? That made “news” your site’s default Template Group, the Template Group that is displayed as the homepage when no Template Group is specified in the URL.
Let’s change this by creating another Template Group and making it the new default.
- Go to .
- Click the New Group button.
- For Template Group Name, type “site”.
- Tick the Make the index template in this group your site’s home page? checkbox.
- Click Submit.
Now click the index Template of our new “site” Group to open the Template Editor. Let’s add this code:
<!DOCTYPE html>
<html>
<head>
        <title>Home</title>
        <meta charset="utf-8">
</head>
<body>
        <h1>Home, Sweet Home.</h1>
        <p>Kick back and relax... you've made it home.</p>

        <h2>The Latest</h2>
        <p>Check out the <a href="{path='news'}">latest news</a>:</p>
        <ul>
                {exp:channel:entries channel="news" limit="10"}
                        <li><a href="{url_title_path='news'}">{title}</a></li>
                {/exp:channel:entries}
        </ul>
</body>
</html>
As usual, click Update and then View Rendered Template to see the results:
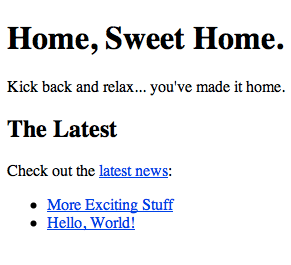
There’s a bit more going on in this Template, so let’s take a closer look.
Linking to Templates and Entries
This line may have caught your attention:
<p>Check out the <a href="{path='news'}">latest news</a>:</p>
It contains the path variable, which creates a URL to a Template Group/Template. In this case we want to link to “news/index”, but since “index” is implied we can leave it off. The path variable is one of many Global Template Variables you can use. Global just means that you can access it from anywhere inside your Template; it doesn’t have to be inside a Tag Pair.
Then there’s this line, which you’ll notice is inside our Channel Entries Tag Pair:
<li><a href="{url_title_path='news'}">{title}</a></li>
url_title_path is one of the many variables you can use inside the Channel Entries Tag, in addition to the variables containing the content of your Channel Fields. It acts very similarly to the path variable we just discussed, but it also appends the Entry’s URL Title to the URL which lets us link directly to the entry, as you’ll see next.
A Dynamic Duo
Now follow the link to our “Hello, World!” Entry, which will look like http://example.com/news/hello-world thanks to url_title_path. You’ll be taken to our News Template Group. But wait, only one Entry is shown now!
What you’re seeing here is the “dynamic” behavior of the Channel Entries Tag. By default the Tag will look for a valid URL Title in the current URL, and if one exists, show only that Entry in what’s known as “Single Entry” mode. This is very useful, since we didn’t have to create another template just to show our Entries all by themselves. In some cases, though, we may not want this to happen. A good example would be if we had a sidebar showing a list of recent Entries from various Channels, and we didn’t want that list influenced by what happens to be in the current URL. To disable this behavior, set the dynamic parameter to “no”:
{exp:channel:entries channel="news" limit="10" dynamic="no"}
Again, all of the Channel Entries’ available parameters and variables are detailed in its documentation page.
Go Forth and Conquer!
Congratulations! You’re ready to start bringing the awesome. Create Channels and Channel Fields to hold your content just the way you need. Then use Templates, Tags and your own markup, style and scripts to create flexible, dynamic websites quickly and easily on a platform that does exactly what you want it to do. Welcome to ExpressionEngine.
While you should read the User Guide in its entirety, here are some topics you might be interested in: