Member Manager
Members Listing
Control Panel Location: Members
This page is used both to search and to browse through members within your ExpressionEngine installation.
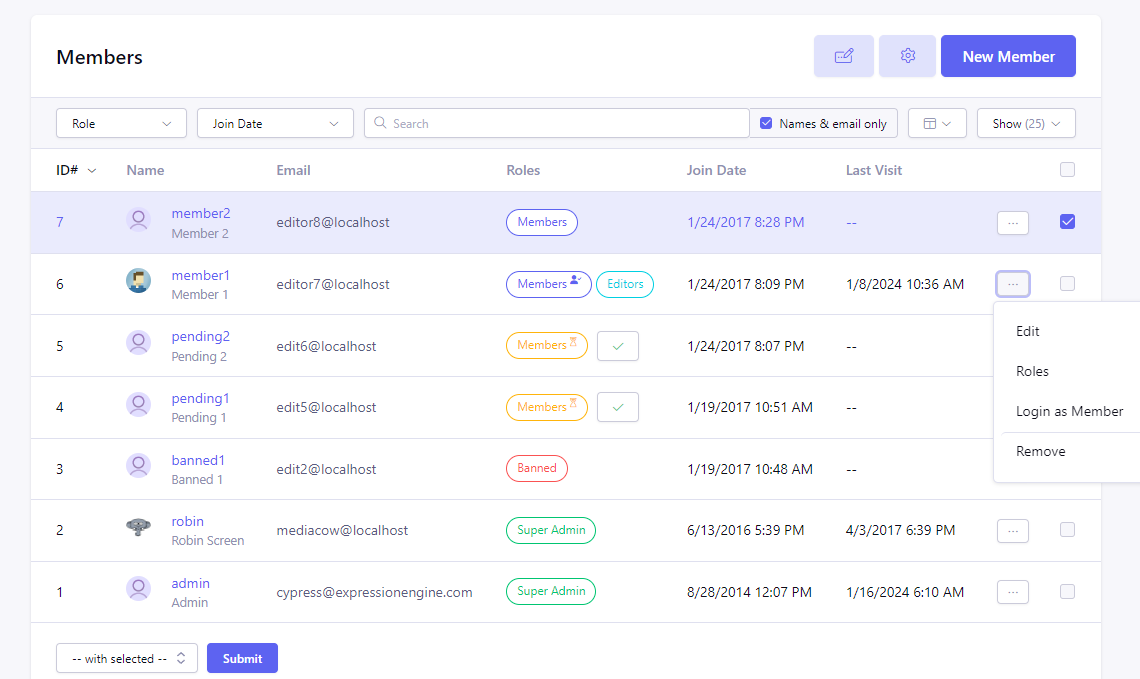
Filters and search input can be used to narrow down the list of members displayed.
The set of columns displayed can be customized using the “Columns” dropdown. By default, the following columns are shown: Member ID, Name (which is composed of avatar, username and screen name), Email, Roles, Join Date, Last Visit Date. Also each member row has “Actions” buttons that contains links to some common actions and a checkbox that allows performing bulk actions on selected members. When “Pending” is selected in the “Role” filter, the bulk action options are “Approve” and “Decline”, otherwise “Remove” is the only option.
All roles assigned to a member are shown in the Roles column. When multiple roles are assigned, the primary role will have an indicator. If the member is pending the column does not say “Pending” but instead shows the role to which the member will be assigned once approved (with pending indicator) and a button to approve.
Member Roles
Control Panel Location: Members > Roles
The Member Roles area of the Control Panel permits you to manage your Member Roles. The member roles can be sorted by ID, Role Name, and Status.
Each member of your site must have at least one Role, which is referred to as the Primary Role. These roles allow you to restrict and control what a given member is allowed to do, and which pages they are allowed to access. Each Member Role has over 50 different privileges that can be allowed or denied, giving you precise control over what each of your members can do.
You can assign multiple roles to a member.
Create/Edit All Member Roles
Control Panel Location: Members > Roles > Create/Edit
This sections allows you to set the various permissions and settings for the selected Member Role.
ExpressionEngine comes with 5 built-in Roles:
- Super Admin (#1) - has full control over the site and all system settings. We advise that all members in this role use Multi-factor authentication
- Banned (#2) - reserved role for members that are registered, but have been banned from accessing the site
- Guests (#3) - reserved role for visitors that are not logged in. It is recommended not to assign any actual member accounts to this role.
- Pending (#4) - members who submitted the registration form, but have not been approved yet (by admin or by verifying their email address, depending on your membership preferences)
- Members (#5) - regular site members. This is the default role that everyone gets registered into, unless specified differently
These roles should never be deleted.
If you need a custom set of permissions for the role, we suggest creating a new role for each case. You can do that by clicking “New Role” button, or you can create a new role based on an existing one by picking “Clone to New Role” from the role’s “Save” dropdown.
Edit the role by clicking its name in the list.
Role Settings
Control Panel Location: Members > Roles > Create/Edit
Roles are highly configurable to manage permissions for members that belong to the role. It is important to note that permissions are additive. This means that if a member belongs to multiple roles they will have the sum of all the permissions granted by each of their roles.
You should be very careful when assigning permissions marked with a shield icon. These are related to the security of your website.
The role settings are grouped into the following tabs.
Role tab
This tab contains the generic settings for the role, including name, description, color label and security preferences (such as requiring MFA). You can also assign the role to Role Groups on this tab.
Website Access tab
Use this tab to set up how members in this role can interact with your website and what actions they can perform on the front-end.
CP Access tab
This tab is used to set up the sections of the Control Panel that members in this role can access. You can also set up specific actions they can perform within each section. There are also settings for defining the look of certain Control Panel pages.
The settings here are grouped into sections for each subset of Control Panel functionality.
Channel
Defines whether and how the members in this role can administrate the Channels and related content structures (such as Categories, Statuses).
Channel Entries
Defines the permissions that members in this role have for creating/editing/deleting entries in each of the channels.
Files
Defines actions members in this role can perform on the files as well as administrative permissions on upload directories.
Note: when editing channel entries with File fields, the members would need access to respective upload directories to modify those.
Members
Defines whether the members of this role can access Member Manager and perform certain actions on members and roles.
Templates
Defines whether the members of this role can create/edit/modify templates, template partials and template variables. Granular administrative permissions can also be set per template group.
Add-Ons
Defines whether the members of this role can access the Add-ons section and which Add-ons they are allowed to access in the Control Panel.
Utilities
Set the CP utilities that members of this role are allowed to use.
Logs
Defines if members of this role can access the Logs section in the Control Panel.
Settings
Defines if members of this role can modify system settings, with separate preferences for subsections which may contain more sensitive settings.
Template Access tab
This tab lists all the templates of your website. If you deselect certain templates, the members in this role will not be able to access site pages that are using these templates. Instead, they will see the “No Access” message as configured in settings for those templates.
Role Groups
Role Groups are a way to organize your roles into logical groups. Create a Role Group by clicking “New” next to Role Groups heading in the sidebar. You can set the role group name and assign roles to it by checking the appropriate checkboxes.
You can then assign members to the Role Group. These members will have all the permissions granted by all of the roles within the Role Group.
Custom Member Fields
Control Panel Location: Settings > Members > Member Fields
The link to this section is also found on top of the Member Listing page.
The Member Fields feature permits you to add fields to the member registration form and/or member profile and My Account areas.
Create/Edit
Control Panel Location: Settings > Members > Member Fields > New/Edit
This section allows you to create or edit Member Fields.
The following field types are compatible and can be used for custom member fields:
- Checkboxes
- Color Picker
- Date
- Duration
- Email Address
- File
- Number Input
- Multi Select
- Radio Buttons
- Range Slider
- Rich Text Editor
- Select Dropdown
- Selectable Buttons
- Text Input
- Textarea
- URL
- Value Slider
Additionally, third-party field types that specify support for the MemberField model can be selected.
The following fields are available when creating a custom field:
Type – You may choose what type of field this is. There are three choices: 1. Text Input: This is a single input line for text. It is the type of field you might use for a title, name, or other short information. 2. Textarea: This is a standard text entry box with multiple lines. This is what you would use for larger amount of text. 3. Drop-down List: This creates a standard HTML
<select>drop-down list. You will need to define contents of the list in the provided form.Name – This is the descriptive name for the field. It will appear as the field title. This is a required field and it may contain spaces or punctuation.
Short name – This is the internal or ‘short name’ for the field. This is a required field and must be a single word with no spaces or punctuation. The short name is typically used as the variable name in your member profile and registration templates. You may optionally add a description of the field, which can be useful if you need to provide instructions for the field’s use.
Note: The fields are typically added automatically by the system so you do not need to edit the templates.
- Require field? – You may optionally add a description of the field, which can be useful if you need to provide instructions for the field’s use.
- Exclude from Anonymization Actions? – When enabled, the contents of the field will not be removed it the user requests to be ‘forgotten’. Otherwise the custom field data will be deleted if the user is anonymized.
- Show in Registration – When enabled, the field will be available in the public member registration form.
- Show in Profile – When enabled, the field will be available within the Member Profile areas (both the public one and the My Account page in the Control Panel).
Register a New Member
Control Panel Location: Members > Create
The New Member Registration section of the Control Panel allows you to manually create a new membership account.
This section has the following options:
- Username – The unique username for the user. This is a required field.
- Email – The email address for the current user.
- Password – Change the user’s password.
- Primary Role – The Role to assign the user to as Primary.
- Additional Roles – other roles to assign to member to extend the scope of permissions.
Ban Settings
Control Panel Location: Settings > Members > Ban Settings
The User Banning section of the Control Panel allows you to ban users by IP address, email, or name.
The ban section has the following options:
IP addresses – Specify IP addresses to ban from site registration and login. Use wildcards to ban blocks of IP addresses. For example,
123.321.*. Each IP address should be placed on a separate line. You also set what happens when a user with a banned IP address tries to access the site: - Restrict the user to viewing the site only. They will not be able to submit comments or do anything else except passively view the content. - Show the user a specific message. - Redirect the user to another specified site.Email addresses – Specify email addresses to ban from site registration and login. Use wildcards for partial email addresses. For example,
*@spammydomain.com. Each address should be placed on a separate line.Restricted usernames – Specify usernames that cannot be used for member accounts, which can be handy for reserving certain usernames for your own use.
Restricted screen names – Specify screen names that cannot be used for member accounts, which can be handy for reserving certain screen names for your own use.
When a banned user attempts access – You can prevent access completely by forwarding them to another website, or show them an unavailable message, or allow them to access the website in view only mode.