Retired Documentation
You are using the documentation for version 2.11.9. Go here for the latest version or check here for your available upgrades to the latest version.
File Upload Preferences
Control Panel Location:
This section of the Control Panel allows you to manage file upload destinations. These destinations determine where you can upload files when using the upload utility on the Publish page. You can create as many destinations as you need in order to organize your uploaded images in the manner you wish.
Note
This utility will not create the actual destination folder on your server so you’ll need to do that using your FTP program. In addition, you must set the file permissions for that folder to 777 so that ExpressionEngine will be allowed to put files into it.
Main Screen
The main File Upload Preferences page shows a list of all the existing upload destinations.
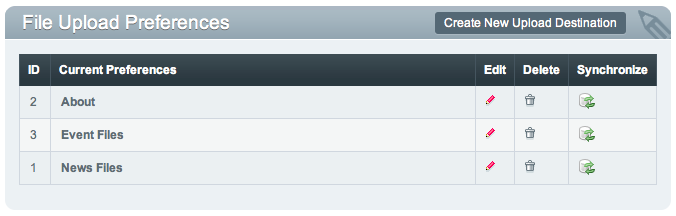
The Synchronize icon allows you to synchronize the file records in the database with the files stored in a given upload directory. See Synchronize Files for details on how this works.
The Create New Upload Destination button takes you to a page where you can create a new destination, or you can click the Edit icon to edit an existing destination. Either of these options will take you to the following page:
Create/Edit Upload Destination
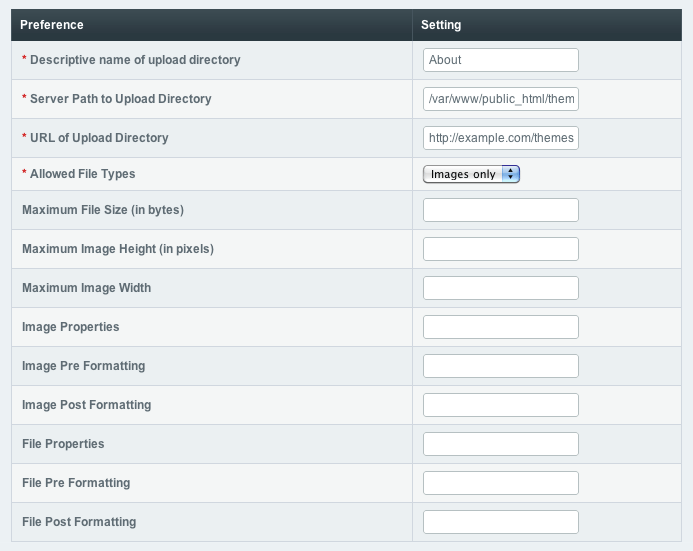
Descriptive name of upload directory
This is the descriptive name of the upload destination. It is a required field and must be unique, but spaces are allowed. This name will appear when uploading files via the PUBLISH page.
Server Path to Upload Directory
The full server path (not a URL) to the upload folder for this destination. For example:
/home/user/example.com/public_html/images/uploads/
If you are not sure how to determine your server path please contact your hosting company.
URL of Upload Directory
The full URL to the new destination. For example: http://example.com/images/uploads/
Allowed File Types
This preference will determine how the system handles the uploaded files. You have two choices for this preference:
- Images only: With this preference set, the system will only allow image files of the type GIF, JPG, JPEG, or PNG.
- All file types: This option will allow you to upload files of any type to the system. Be careful with this setting since it could be possible for someone to upload a malicious file.
Note
Only file types that are specified in ExpressionEngine’s Mime
Type file are allowed to be uploaded. If you are uploading something
uncommon and run into problems you may need to add the mime type for
your file. The Mime Type file can be found at:
system/expressionengine/config/mimes.php
Maximum File Size (in bytes)
You can optionally set a maximum allowed size for uploaded file. Leave the setting blank if you do not wish to impose a limit. The size is defined in bytes; 1 kilobyte = 1024 bytes. Example: to limit each upload to 30 kilobytes, you’ll put 30720 in the field.
Note
Servers usually also have built-in limits on the amount of data that can be uploaded via PHP at one time. The default value for this in PHP is 2 MB. If you have a need to upload very large files, then you should contact your Host or server admin and talk to them about any size limits they have in place.
Maximum Image Height (in pixels)
You can optionally set the maximum allowed height for uploaded images, images over this setting will be automatically resized. Leave both this setting and the maximum width setting blank if you do not with to impose a limit. The size is defined in pixels. This option only applies to uploaded images and not other file types.
Maximum Image Width
You can optionally set the maximum allowed width for uploaded images, images over this setting will be automatically resized. both this setting and the maximum height setting blank if you do not with to impose a limit. The size is defined in pixels. This option only applies to uploaded images and not other file types.
Note
If either the maximum height or maximum width is set and the other left blank, images that exceed the specified setting will still be resized, using the specified setting as the master dimension.
Image Properties
These properties will be added inside the image tag (if an image is uploaded). Leave this setting blank if you do not wish for any properties to be added.
For example: If you have border=”0” alt=”image” name=”image” set as your preference, when you upload an image, the resulting tag will look like this:
<img src="http://example.com/images/upload/pic.jpg" border="0" alt="image" name="image" width="124" height="98" />
Image Pre Formatting
This setting lets you specify data to be placed before the HTML for an uploaded image. Using this (and the following) setting you can easily “wrap” your file code. For example, you could use <div class=”thumb”>.
Image Post Formatting
This setting lets you specify data to be placed after the HTML for an uploaded image. Using this (and the previous) setting you can easily “wrap” your file code. For example, you could use </div>. Together with the previous setting you would get this output:
<div class="thumb"><img src="http://example.com/images/upload/pic.jpg" border="0" alt="image" name="image" width="124" height="98" /></div>
File Properties
These properties will be added inside the link tag (if a file is uploaded). Leave this setting blank if you do not wish for any properties to be added.
For example: If you have title=”file_name” set as your preference, when you upload a file, the resulting tag will look like this:
<a href="http://example.com/images/upload/plan.txt" title="file_name">plan.txt</a>
File Pre Formatting
This setting lets you specify data to be placed before the HTML for an uploaded file (non-image). Using this (and the following) setting you can easily “wrap” your file code. For example, you could use <div class=”file”>.
File Post Formatting
This setting lets you specify data to be placed after the HTML for an uploaded file (non-image). Using this (and the previous) setting you can easily “wrap” your file code. For example, you could use </div>. Together with the previous setting you would get this output:
<div class="file"><a href="http://example.com/images/upload/plan.txt" >plan.txt</a></div>
File Category Groups
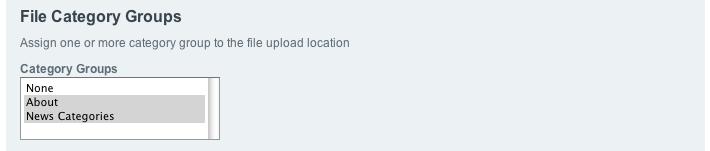
You may assign multiple category groups to a file upload directory, which will allow you to assign categories to any uploaded files.
Image Manipulations

This area allows you to specify one or more alternate versions of an image that automatically get created when the original image is uploaded. A manipulation can include a resized version, a watermark, or both.
The resize type will determine whether the image is constrained (resized) or cropped to the specified dimensions. If only height or width is specified, the thumbnails will be created using that as the master dimension. For example, setting the height to 200 and leaving the width blank will result in an image that is no higher than 200 pixels, with the width resized proportionately. Setting both the height and the width to 200 would result in an image that is no higher or wider than 200 pixels.
You can refer to a particular Image Manipulation in your templates via a File Field’s single variable tag or its variable pair tag.
Restrict file uploading to select member groups
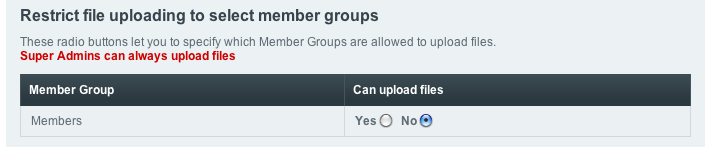
This setting allows you to specify which member groups have permission to upload files to this file upload destination. By default, only the “Members” group and any user-created member groups are listed. Super Admins can always upload files.