Retired Documentation
You are using the documentation for version 2.11.9. Go here for the latest version or check here for your available upgrades to the latest version.
Default HTML Buttons
Control Panel Location:
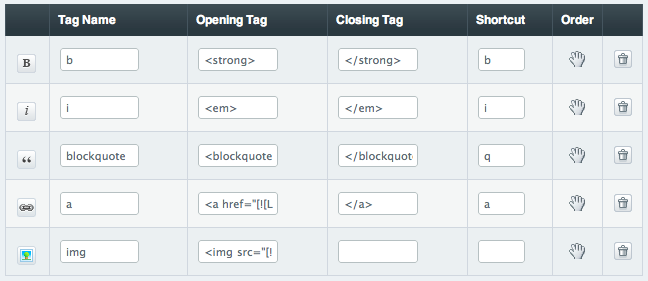
This section of the Control Panel allows you to define your default HTML buttons. HTML buttons appear in the PUBLISH page and allow you to add basic HTML to your entries.
Note
Each member of your site is allowed to specify their own HTML buttons via their My Account page. These default buttons are only used with members that have not defined their own.

Adding Buttons
Buttons can be added either from the set of predefined buttons by using the “Add HTML button” option, or constructed manually by entering the Tag Name, Opening, Closing and Shortcut options. For advanced options, see “Advanced Customization” below.
Tag Name
The name of the tag. This is what appears as the label for the button, so it should typically be short and obvious as to the function. Often this is the same as the actual HTML tag. This is a required field.
Opening Tag
The opening tag of the HTML tag. For instance, if you’re adding an entry for the strong tag (<strong></strong>) then the Opening Tag would be <strong>.
Closing Tag
The closing tag of the HTML tag. For instance, if you’re adding an entry for the strong tag (<strong></strong>) then the Closing Tag would be </strong>.
Shortcut
This defines the shortcut key you can use to invoke the HTML tag while you are editing. For example, if you set the shortcut to be “h”, then the shortcut key combination will be ALT+h.
Order
These settings determine the order in which the HTML buttons are displayed on the channel new entry form.
Deleting
Delete an existing HTML button using the delete icon (trash can) on its row. There is no verification performed; once you submit the HTML button is removed immediately.
Advanced Customization
The custom HTML buttons are powered by the jQuery library MarkItUp. Because of this, some powerful customization is possible in the “opening tag” field. If you wish to take advantage of this syntax, more information can be found on within the MarkItUp documentation, and particularly under the section on Magic Markup.
