Retired Documentation: You are using the documentation for version 1.7.3 which was retired in 2013. Go here for the latest version documentation or check here for your available upgrades to the latest version.
Quick Start Tutorial - Step 7Bringing it all Together with EE Tags
The Goal: Learn about Modules (specifically the EE Weblog module), learn about Single EE Tags, learn about Pair EE Tags, learn how to use Parameters in EE Tags, learn how to use Variables in EE Tags, learn the basics of EE URLs, learn about the Path Global Variable, finish your Getting Started Tutorial Weblog!
Review
Let's review what you've accomplished so far. First you created the HTML for your web site with a Template Group and Templates. Then you created a new Weblog for your web site to hold the content. And you just finished publishing four entries to the new Weblog. Now you need to tell your Templates how to display your content. To do this, you'll use EE Tags.
What is an EE Tag?
An EE Tag tells your EE database how to display information on your web site. Tags grant you a lot of control and flexibility in what information is displayed, how that information is displayed, and even when information is displayed.
What does a an EE Tag Look Like?
A Tag is easy to spot since it's surrounded by curly brackets and always begins with "exp:" Here is an example.
{exp:weblog:weblog_name}
The first part of the tag, exp:, tells ExpressionEngine that this is a tag. The second part, weblog, is the module that the tag belongs to, in this case the Weblog module. The third part (which not every tag will have), weblog_name, is the specific function from within the module that you're calling; in this case the function to display the "Weblog name."
Important concept: Most of ExpressionEngine's functionality is achieved using "Add-on Modules," which are components that provide specific features and capability. ExpressionEngine currently has 20 different modules, which include Weblog and Content management, Mailing List, Search Engine, Communications, Moblog, Photo Gallery, and a Discussion Forum. Each module has a set of EE Tags that you put in your Templates to access a Module's functionality.
Parameters
But wait! You have two Weblogs. You have the default Weblog and you have new Getting Started Tutorial Weblog that you created for this tutorial. How does the EE Tag know which Weblog name to display? Good question. The answer is that the EE Tag doesn't know which Weblog name to display. So you need to tell the EE Tag that you want to display the Weblog name of the Getting Started Tutorial Weblog. You do this using Parameters.
Parameters let you control and modify the behavior of an EE Tag. In your case, you need to control which Weblog name gets displayed, so you add a parameter like this:
{exp:weblog:weblog_name weblog="gst_blog"}
Parameters are made up of the Parameter name, in this case weblog, and a value, in this case "gst_blog" (because that is the Short Name of the Getting Started Tutorial Weblog). The value is always enclosed. The name is assigned the value using =.
Important concept: Whenever you need to tell EE to get information from a specific Weblog, you always use the Weblog's Short Name. You can find the Short Name by clicking Admin --> Weblog Administration --> Weblog Management.
Try it!
Copy the code below into the "index" Template in your "tutorial" Template Group.
<h1>The name of my weblog is {exp:weblog:weblog_name weblog="gst_blog"}</h1>
Put the code right below the opening "body" HTML tag, as shown below.
<html>

<head>

<title>My First EE Site</title>

</head>

<body>


<h1>The name of my weblog is {exp:weblog:weblog_name weblog="gst_blog"}</h1>


<h2>The title of my post</h2>


<div class="entry">


<p>Hello world! This is where my entry should show up.</p>


</div>


</body>

</html>
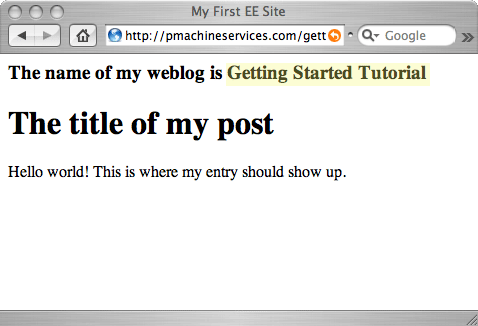
When you view your Template in a browser, {exp:weblog:weblog_name weblog="gst_blog"} is rendered with the actual name of the Weblog, as highlighted below.

Single and Pair Tags
The {exp:weblog:weblog_name} is an example of a Single Tag. Single Tags are designed to return a single value or a single piece of information.
A Pair Tag is designed to return multiple pieces of information. Pair Tags differ from Single Tags in two ways. First, a Pair Tag needs to be closed. And second, a Pair Tag can hold content between its opening and closing lines.
Look at the Weblog Entry Tag as an example.
{exp:weblog:entries weblog="gst_blog"}


Some content goes here.


{/exp:weblog:entries}
Like Single Tags, Pair Tags can use Parameters. In Pair Tags, Parameters always go in the opening line, as shown above. Closing a Pair Tag is always the same. Just add a "/" before the name of the Tag. Notice that the Parameters are not repeated in the closing section, just the name of the Tag.
The really cool thing about Pair Tags is that you can use Variables which allow you to pull even more information for use on your web site.
Variables
Whereas a Parameter controls and modifies, a Variable gets replaced. The easiest way to learn this is to just try it. You'll catch on right away.
In the "index" Template in the "tutorial" Template Group, find this HTML:
<h1>The title of my post</h1>


<div class="entry">


<p>Hello world! This is where my entry should show up.</p>


</div>
Now you're going to integrate the the Weblog Entry Tag into the HTML. This will allow you to display the content of the Getting Started Tutorial Weblog you created on your web site.
First, open the Weblog Entry Tag. Remember, since you have more than one one Weblog, you need to use the weblog Parameter to tell EE each Weblog to display.
{exp:weblog:entries weblog="gst_blog"}


<h1>The title of my post</h1>


<div class="entry">


<p>Hello world! This is where my entry should show up.</p>


</div>
Second, replace "The title of my post" with the {title} Variable. When the Template is rendered in a browser, the {title} Variable will be replaced with the actual title of your Weblog entry. The User Guide documents which Variables can be used in a specific EE Tag. We'll cover how to look that up shortly.
{exp:weblog:entries weblog="gst_blog"}


<h1>{title}</h1>


<div class="entry">


<p>Hello world! This is where my entry should show up.</p>


</div>
Third, replace "Hello world! This is where my entry should show up." with the {summary} Variable. When the Template is rendered in a browser, the {summary} Variable will be replaced by the contents of your Weblog entry's Summary field.
Notice that here you are also replacing the HTML <p> tags. By default all EE weblog entries are formatted as valid xhtml, so appropriate <p> tags will be added automatically. (You can change the default setting on the Publish and Edit screens. You can change the default formatting as well.)
{exp:weblog:entries weblog="gst_blog"}


<h1>{title}</h1>


<div class="entry">


{summary}


</div>
Fourth, close the Weblog Entry Tag.
{exp:weblog:entries weblog="gst_blog"}


<h1>{title}</h1>


<div class="entry">


{summary}


</div>


{/exp:weblog:entries}
Your "index" Template in the "tutorial" Template Group should now have this code.
<html>


<head>


<title>My First EE Site</title>


</head>


<body>


<h2>The name of my weblog is {exp:weblog:weblog_name weblog="gst_blog"}</h2>


{exp:weblog:entries weblog="gst_blog"}


<h1>{title}</h1>


<div class="entry">


{summary}


</div>


{/exp:weblog:entries}


</body>


</html>
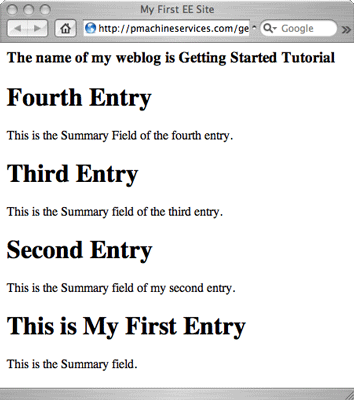
Now, update the Template and view it a browser. You should see something similar to the screen shot below.

Notice that by default the Weblog Entry Tag displays all entries in the specified Weblog starting with the most recent. You can use Parameters to change this. Again, we'll cover how to look up Parameters shortly.
Linking to the "Full" Entry
A standard practice in traditional weblogs, news sites, ezines, and a number of other sites is to have a listing of "blurbs" or "summaries" of articles, entries, news releases, etc. on a page with a "read more" link that goes to a page with the "full" story, article, page, etc.
Right now, your index Template shows the summaries (Summary field) of your Weblog entries. The last step in completing your web site is to turn your "article" template into a page that shows the "full" story or entry and link to it with a "read more" link from your "index" Template.
Linking to the "article" Template
There are a number of ways you could link to the "article" Template. We'll show you the one that is most search engine friendly: the {title_permalink} Variable available to the Weblog Entry Tag.
The {title_permalink} variable uses the URL Title field to construct a nice, search engine friendly URL that is also easily readable in English. Variables, like Parameters, can also have values. In this case, you want to tell the {title_permalink} Variable to link to the "articles" Template, so specify the value like so:
{title_permalink="tutorial/article"}
Notice that the value is the Template Group name followed by the name of Template you want to link to. In general, URLs in EE are always written in this format. Here's how to use it in a standard HTML link:
<a href="{title_permalink='tutorial/article'}">Read More</a>
This will render as:
<a href="http://example.com/index.php/tutorial/article/url_title_of_entry/">Read more</a>
Now update your "index" Template with the code below (changes are in bold).
<html>


<head>


<title>My First EE Site</title>


</head>


<body>


<h2>The name of my weblog is {exp:weblog:weblog_name weblog="gst_blog"}</h2>


{exp:weblog:entries weblog="gst_blog"}


<h1>{title}</h1>


<div class="entry">


{summary}


<p><a href="{title_permalink='tutorial/article'}">Read More</a></p>


</div>


{/exp:weblog:entries}


</body>


</html>
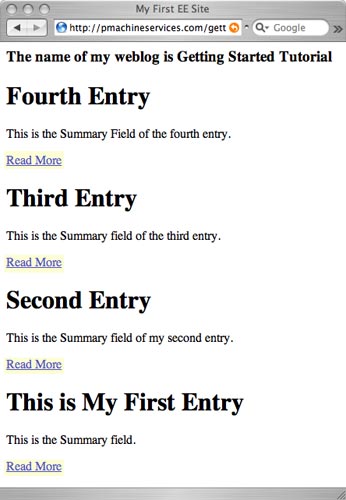
When you update and view your "index" Template, you'll see that the "Read More" link has been added, as highlighted in the screen shot below.

Preparing the "article" Template
Now that you've linked to the "article" Template, you need to prepare it to show the "full" Weblog entry. The "full" entry, for the purposes of this tutorial, is a page that displays the Summary, Body, and Extended fields from your Getting Started Tutorial Weblog.
Open the Edit screen for your "article" Template in the "tutorial" Template Group and replace the existing code with the code below. The only difference between the code below and the code on the "index" Template is that it adds the {body} and {extended} Variables which will display the content in the Body and Extended fields of your Getting Started Tutorial Weblog. It also adds a link at the bottom of the page to easily return to the "index" Template. The changes are in bold.
<html>


<head>


<title>My First EE Site</title>


</head>


<body>


<h2>The name of my weblog is {exp:weblog:weblog_name weblog="gst_blog"}</h2>


{exp:weblog:entries weblog="gst_blog"}


<h1>{title}</h1>


<div class="entry">


{summary}


{body}


{extended}


</div>


{/exp:weblog:entries}


<p><a href="{path='tutorial/index'}">Back to the main page</a>.</p>


</body>


</html>
Just a quick note here: The {path="tutorial/index"} Variable that you used to create the link back to the "index" Template is a Global Variable, meaning that it can be used anywhere in any Template. It's the easiest way to create basic links to any template in your EE installation. As mentioned earlier, the format for links is always template_group/template. The User Guide has more information on the Path Global Variable and a full explanation of how URLS work.